Add the following:
In general, different types of pores may be pictured as apertures, channels, or cavities within a solid body or as space (i.e., interstices or voids) between solid particles in a bed, compact, or aggregate. Porosity is a term that is often used to indicate the porous nature of solid material and is more precisely defined as the ratio of the volume of accessible pores and voids to the total volume occupied by a given amount of the solid. In addition to the accessible pores, a solid may contain closed pores, which are isolated from the external surface and into which fluids are not able to penetrate. The characterization of closed pores, i.e., cavities with no access to an external surface, is not covered in this general chapter.
Porous materials may take the form of fine or coarse powders, compacts, extrudates, sheets, or monoliths. Their characterization usually involves the determination of the total pore volume or porosity as well as the pore size distribution.
It is well established that the performance of a porous solid (e.g., its strength, reactivity, permeability, or adsorbent power) is dependent on its pore structure. Many different methods have been developed for the characterization of pore structure. In view of the complexity of most porous solids, it is not surprising to find that the results obtained are not always in agreement and that no single technique can be relied upon to provide a complete picture of the pore structure. The choice of the most appropriate method depends on the application of the porous solid, its chemical and physical nature, and the range of pore size.
This chapter provides guidance for measurement of porosity and pore size distribution by mercury porosimetry. It is a comparative test, usually destructive, in which the volume of mercury penetrating a pore or void is determined as a function of an applied hydrostatic pressure that can be related to a pore diameter. Other information such as pore shape and interconnectivity, the internal and external surface area, powder granulometry, and bulk and tapped density can also be inferred from volume–pressure curves; however, these aspects of the technique do not fall under the scope of this chapter.
Practical considerations presently limit the maximum applied absolute pressure reached by some equipment to about 400 MPa, corresponding to a minimum equivalent pore diameter of approximately 0.003 µm. The maximum diameter will be limited for samples having a significant depth because of the difference in the hydrostatic head of mercury from the top to the bottom of the sample. For most purposes this limit may be regarded as 400 µm.
Interparticle and intraparticle porosity can be determined, but the method does not distinguish between these porosities where they coexist.
The method is suitable for the study of most porous materials. Samples that amalgamate with mercury, such as certain metals, may be unsuitable for this technique or may require a preliminary passivation. Other materials may deform or compact under the applied pressure. In some cases, it may be possible to apply sample compressibility corrections, and useful comparative data may still be obtained.
The mercury porosimetry technique should be considered to be comparative, because for most porous media, a theory is not available to allow an absolute calculation of results of pore size distribution. Therefore, this technique is mainly recommended for development studies.
Mercury is toxic. Appropriate precautions must be observed to safeguard the health of the operator and others working in the area. Waste material must also be disposed of in a suitable manner, according to local regulations.
PRINCIPLE
The technique is based on the measurement of the mercury volume intruded into a porous solid as a function of the applied pressure. The measurement includes only those pores into which mercury can penetrate at the pressure applied.
A nonwetting liquid penetrates into a porous system only under pressure. The pressure applied is in inverse proportion to the inner width of the pore aperture. In the case of cylindrical pores, the correlation between pore diameter and pressure is given by the Washburn equation:
p
dp =
APPARATUS
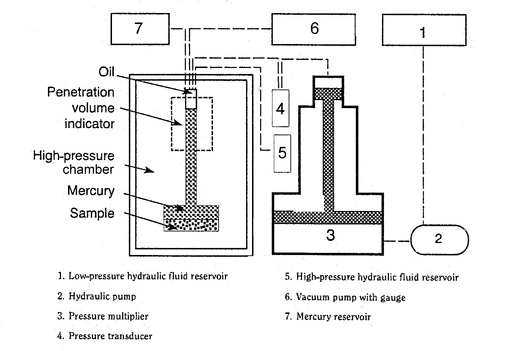
The sample holder, referred to as a penetrometer or dilatometer, has a calibrated capillary tube, through which the sample can be evacuated and through which mercury can enter. The capillary tube is attached to a wider tube in which the test sample is placed. The change in the volume of mercury intruded is usually measured by the change in capacitance between the mercury column in the capillary tube and a metal sleeve around the outside of the capillary tube. If precise measurements are required, the internal volume of the capillary tube should be between 20% and 90% of the expected pore and void volume of the sample. Because different materials exhibit a wide range of open porosities, a number of penetrometers with different diameter capillary tubes and sample volumes may be required. A typical setup for a mercury porosimeter instrument is given in Figure 1. The porosimeter may have separate ports for high- and low-pressure operation, or the low-pressure measurement may be carried out on a separate unit.
The pressure range is typically 4 kPa to 300 kPa for low-pressure operation and above 300 kPa for high-pressure operation, depending on the design of the particular apparatus and on the intended use.
METHOD
Sample Preparation—
The sample is pretreated to remove adsorbed material that can obscure its accessible porosity by either heating and/or evacuation or by flowing inert gas. It may be possible to passivate the surface of wettable or amalgam-forming solids by producing a thin layer of oxide, or by coating with stearate. The sample of the pretreated solid is weighed and transferred to the penetrometer. The pore system of the sample is then degassed in a vacuum to a maximum residual pressure of 7 Pa.
Filling the Penetrometer with Mercury—
Use mercury of analytical quality. The sample is overlaid with mercury under vacuum. The vacuum is required to ensure the transfer of mercury from the reservoir to the penetrometer. In a filled penetrometer, the filling pressure is comprised of the applied pressure plus the pressure contribution created by the head of mercury contacting the sample. A typical filling pressure would be about 4 kPa. The hydrostatic pressure of the mercury over the sample can be minimized by filling the penetrometer in the horizontal positions.
Low-Pressure Measurement—
Admit air or nitrogen in a controlled manner to increase the pressure either in stages corresponding to the particular pore sizes of interest, or continuously at a slow rate. The concomitant change in the length of the mercury column in the capillary tube is recorded. When the maximum required pressure has been reached, reduce the pressure to ambient.
High-Pressure Measurement—
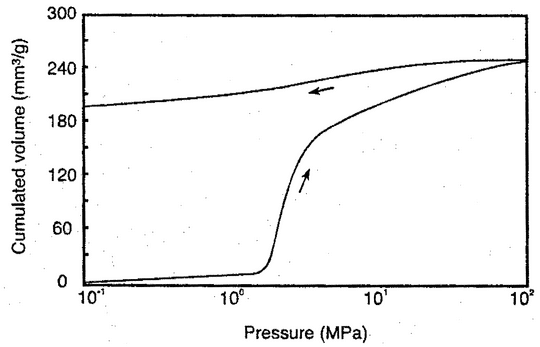
After measurement at low-pressure conditions, the penetrometer filled with mercury is transferred to the high-pressure port or unit of the instrument and overlaid with hydraulic fluid. Mercury is intruded into the pore system via the hydraulic fluid. Increase the pressure in the system to the maximum pressure reached in the low-pressure measurement, and record the intrusion volume at this pressure, because subsequent intrusion volumes are calculated from this initial volume. Increase the pressure either in stages corresponding to the particular pore sizes of interest, or continuously at a slow rate. The fall in the mercury column is measured up to the maximum required pressure. If required, the pressure may be decreased either in stages or continuously at a slow rate to determine the mercury extrusion curve. Make corrections to take account of changes in the volume of the mercury, the penetrometer, and other components of the volume detector system under elevated pressure. The extent of the corrections may be determined by means of blank measurements under the same conditions. An experimentally determined volume–pressure curve is shown in Figure 2.
REPORTING OF RESULTS
The pressure readings are converted to pore diameter by means of the Washburn equation or by another model.
The surface tension of mercury,  , depends not only on the temperature and the material, but also—in the case of markedly curved surface areas—on the radius of curvature. In general, values between 0.41 N·m–1 and 0.52 N·m–1 are measured at room temperature. If the value is not known,
  = 0.48 N·m–1 can be used.
The contact angle of mercury  in most cases is more than 90
 . It may be determined using a contact angle instrument. If the
  value is not known, 130
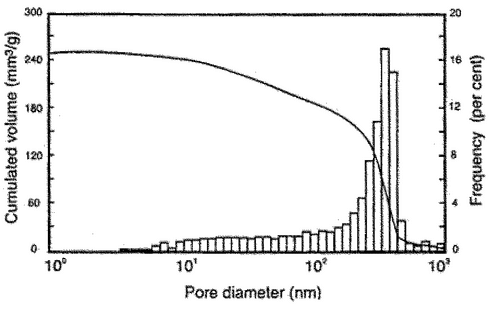
 can be used. Report the values of contact angle, surface tension, and the model used in the calculation. Visualization of the data can be done with several types of graphs. Frequently, in a graphical representation, the pore diameter is plotted on the abscissa and the dependent intruded specific volume on the ordinate to give the pore size distribution. It is appropriate here to choose a logarithmic scale for the abscissa (see Figure 3). The spaces between the particles of the solid sample are included as pores in the calculation. If the pores differ in size from the voids, the latter can be separated by choosing the relevant pore size range.
Extrusion curves may not be used for calculating the pore size distribution (for hysteresis, see Figure 2), because an intruded part of the mercury always remains in the pore system. The retention ratio may be useful for the qualitative characterization of pores that are only accessible via narrow openings (“ink-bottle pores”).
The most common characteristic values, such as the total intruded specific volume, the mean, and the median pore diameter are calculated from the pore size distribution. Moreover, sufficient information should be documented about the sample, the sample preparation, the evacuation conditions, and the instrument used.
CONTROL OF THE INSTRUMENT'S PERFORMANCE
As the mercury porosimetry technique is considered as a comparative test, no details are given in this chapter. However, it is recommended that a stable comparison material should be tested on a regular basis to monitor instrument calibration and performance. USP35
USP35
Auxiliary Information—
Please check for your question in the FAQs before contacting USP.
| Topic/Question | Contact | Expert Committee |
|---|---|---|
| General Chapter | Robert H. Lafaver, M.S.
Scientific Liaison 1-301-816-8335 |
(GCPA2010) General Chapters - Physical Analysis |
USP35–NF30 Page 149
Pharmacopeial Forum: Volume No. 31(3) Page 905


